ALPHA THETA OMNIS-DUO
SETUP
Firmware & Drivers
Firmware:
Update the firmware of the Omnis Duo to the latest available version from https://www.pioneerdj.com/en/support/software/all-in-one-system/omnis-duo/
Drivers :
Windows : Install the latest ASIO drivers from https://www.pioneerdj.com/en/support/software/all-in-one-system/omnis-duo/
Mac OS : You don't have to install this driver software. Mac OS standard driver will be automatically installed when your Omnis Duo is connected to your Mac with a USB cable.
VirtualDJ Setup
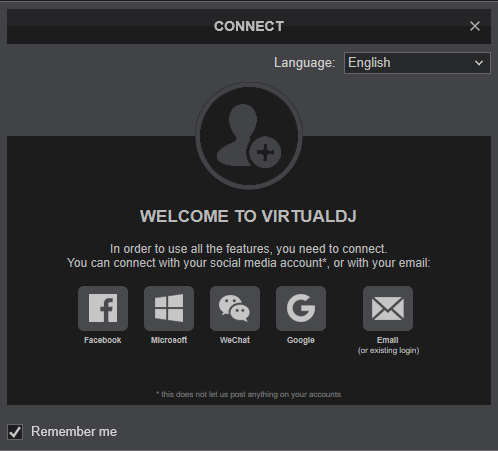
Once VirtualDJ is opened, a Connect Window will appear to enter your virtualdj.com account credentials.
A Pro Infinity or a Pro Subscription License is required to fully use the Alpha Theta Omnis Duo Without any of the above Licenses, the controller will operate for 10 minutes each time you restart VirtualDJ.
https://www.virtualdj.com/buy/index.html
Select the Software Control mode from the Omnis Duo.
- Press the SOURCE button on the Display menu
- Select the SOFTWARE CONTROL mode
- Press the LOAD 1 button at the right side of the Display
- Press the LOAD 2 button at the right side of the Display
Click to OK
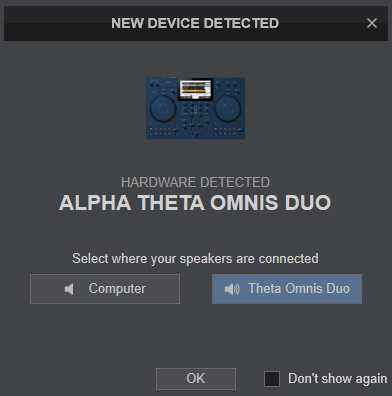
The device is now ready to operate.
MIDI Operation
The device should be visible in the CONTROLLERS tab of Config and the “factory default” available/selected from the Mappings drop-down list. The factory default Mapping offers the functionality described in this Manual, however those can be adjusted to your needs via VDJ Script actions.
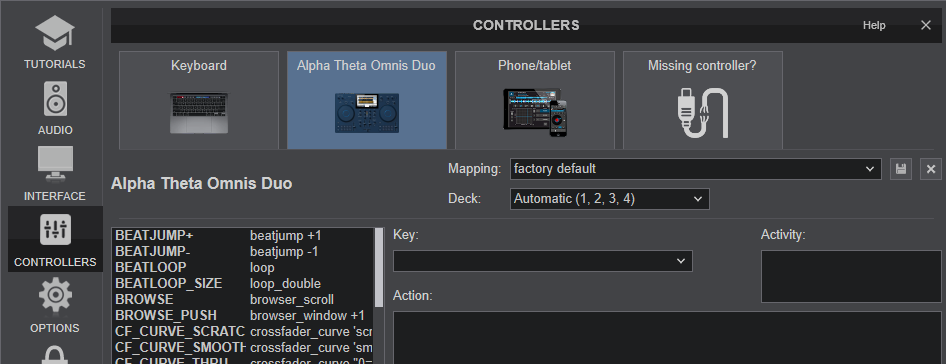
Find more details at https://www.virtualdj.com/wiki/VDJ8script.html
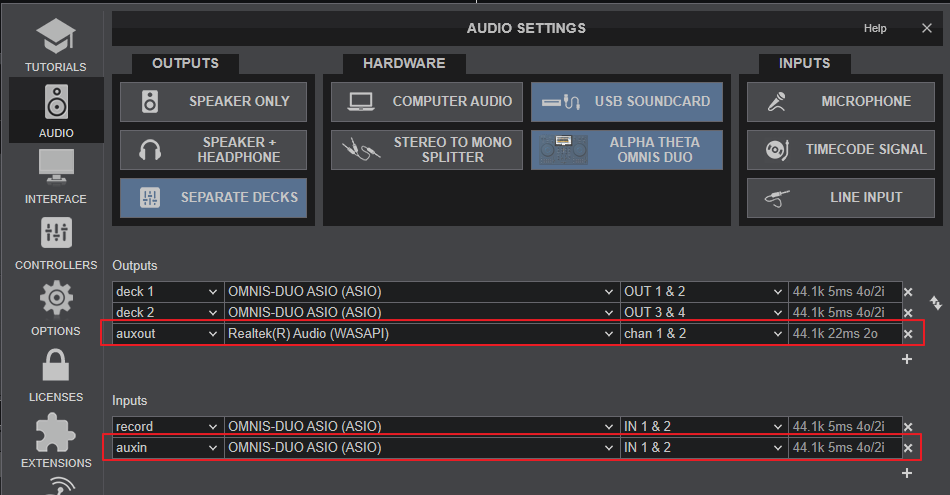
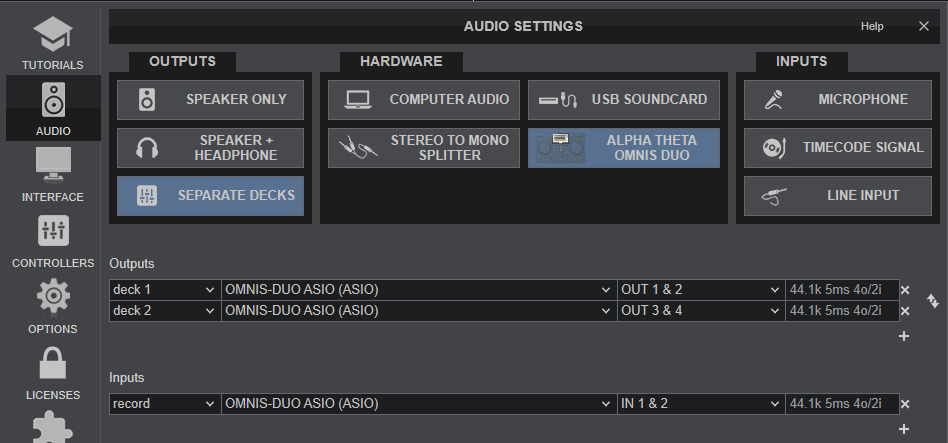
AUDIO Setup
The device has a pre-defined Audio setup and a special button in the AUDIO tab of Config to provide that.

For further software settings please refer to the User Guides of VirtualDJ.
https://www.virtualdj.com/manuals/virtualdj8/index.html
Refer to the manual of the device for further features-settings. at... https://www.pioneerdj.com/en/support/documents/all-in-one-system/omnis-duo/
LAYOUT
S SHIFT : Press and hold this button to access secondary functions of other controls on the Omnis Duo
S POWER : Press and hold this button to power on the Omnis Duo. Press to power-off.
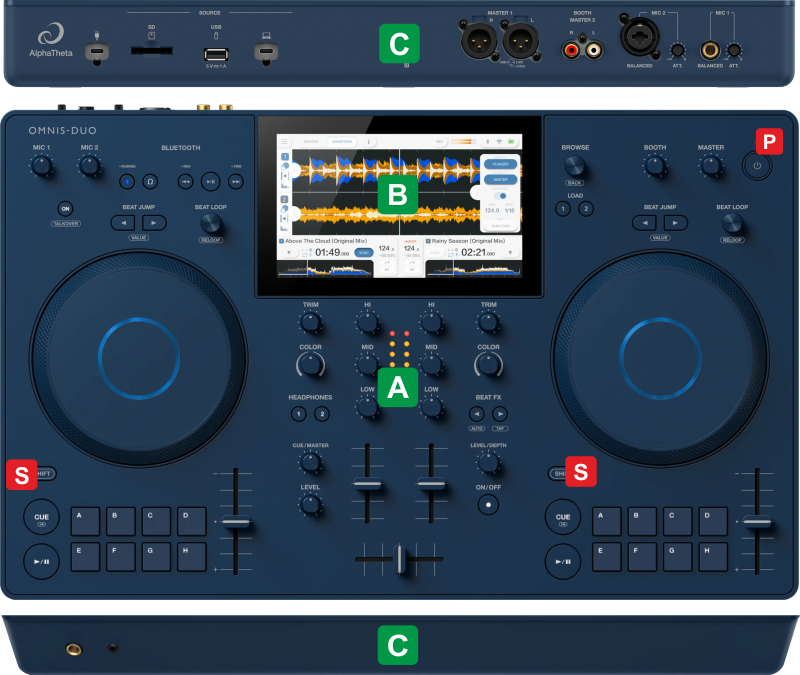
The functionality of each button, knob and connection per section (as shown in the image above) will be explained in detail in the next chapters
ATop Panel Controls
B Display
C Front & Rear Panels
TOP PANEL CONTROLS
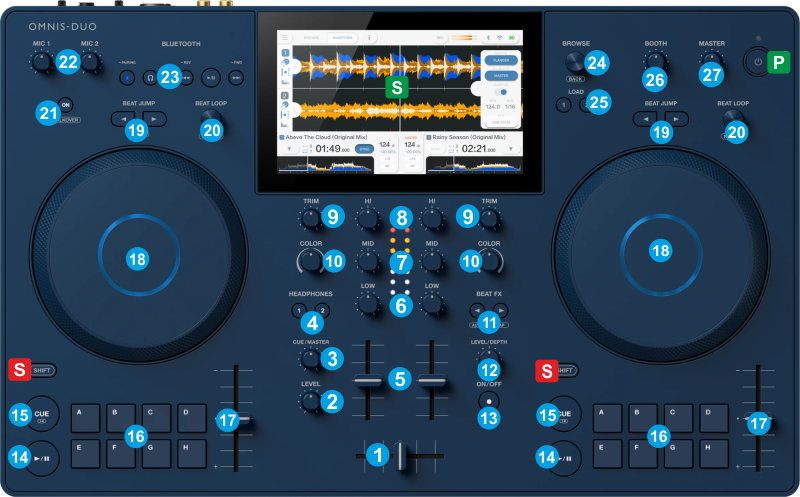
S SHIFT : Press and hold this button to access secondary functions of other controls on the Omnis Duo
MIXER CONTROLS
- CROSSFADER: Blends audio between the left and right mixer channels.
- PHONES LEVEL: Adjusts the level of the Headphones Output (Connection at the front panel). Hardware Control - Movement visible on VirtualDJ GUI
- PHONES MIXING: Turn to blend between Cue and Mix in the Headphone channel. When all the way to the left, only channels routed to the Headphones channel (via the PFL buttons [4]) will be heard. When all the way to the right, only the Program mix will be heard. Hardware Control - Movement visible on VirtualDJ GUI
- PHONES PFL. Press these buttons to send Left/Right channel's pre-fader signal to the Headphones Channel for monitoring. When engaged, the button will be lit. Hardware Control - status not visible on VirtualDJ GUI
- VOLUME: Control the output Volume of Left/Right Mixer Channel.
- EQ LOW . Use this knob to adjust the Low (Bass) frequencies of Left/Right mixer channel.
- EQ MID . Use this knob to adjust the Mid (Middle) frequencies of Left/Right mixer channel.
- EQ HI. Use this knob to adjust the High (Trebble) frequencies of Left/Right mixer channel.
- TRIM: Adjusts the pre-fader output level (gain) of Left/Right channel mixer.
FX CONTROLS
The BEAT FX section is used to apply Hardware effects to Decks, Master or Mic, depending on the selected source. You can change the source the Beat FX will apply to via the right-side slide panel on the Omnis Duo screen.
- COLOR. Use this knob to apply the selected Hardware Color FX. When in middle position, the selected Color FX is not applied, even if it is enabled from the selection buttons. The selection of the Hardware Color FX is offered from right-side slide FX panel on the Omnis Duo screen.
The knob is not controlling the Color FX of VirtualDJ - BEAT FX < >: Use these buttons to half/double the Beats Parameter of the selected Hardware Effect . The beats value is displayed on the Omnis Duo screen.
- BEAT FX LEVEL/DEPTH: Use this knob to adjust the Level/Depth of the selected Hardware Effect.
- BEAT FX ON: Use button to enable/disable the selected Hardware FX. Its led will flash when enabled
DECK CONTROLS
- PLAY: Play/Pauses the Deck. Hold SHIFT down and use this button to play-stutter the Deck.
- CUE: When the Deck is paused, you can set a temporary Cue Point by moving the Platter to place the Audio Pointer at the desired location and then pressing the Cue Button. During playback, you can press the Cue Button to return the track to this Cue Point. (If you did not set a Cue Point, then it will return to the beginning of the track.). If the Deck is paused, you can press and hold the Cue Button to play the track from the Temporary Cue Point. Releasing the Cue Button will return the track to the temporary Cue Point and pause it. To continue playback without returning to the Temporary Cue Point, press and hold the Cue Button, then press and hold the Play Button, and then release both buttons.
- PADS: Use these buttons to assign a Hotcue (1 to 8) at the current position and use again to jump to their stored position. Hold SHIFT down and then use the buttons to delete the assign Hotcue.
The same buttons can be set to control the Pads of VirtualDJ. See Advanced Setup - PITCH : Pitch fader to adjust the Tempo of the track.
- JOG: Touch sensitive platter for scratching or bending. When in Vinyl mode, use the upper part of the jogwheel to scratch and the outer part to bend. When in Bend mode (Vinyl mode is disabled), use any part of the jogwheel to bend.
Hold SHIFT and use the JOG in Seek (Search) mode. - BEAT JUMP < > : Use these buttons to move the Deck backwards (<) or forward (>) by the selected size of beats. Hold SHIFT down and then use these buttons to half/double the size of the beats. The selected Beats value will be visible on the Omnis Duo screen.
- BEAT LOOP: Turn this encoder (anti)clockwise to (half)/double the size of the Loop in beats. The selected size will be visible in VirtualDJ GUI.
Push the encoder to enable/disable the Loop.
While Deck is in Loop, hold SHIFT down and then turn the encoder to move the Loop backwards/forward by 1 beat.
MIC CONTROLS
- MIC ON : Turn both Microphone 1 and 2 Inputs on/off. (Connection at the rear panel).
- MIC 1/2 LEVEL : Adjust the output levels of Microphone 1 and 2 inputs
Note : All Microphone controls are Hardware - not visible on VirtualDJ GUI
OTHER CONTROLS
- BLUETOOTH : An external device can be paired via Bluetooth and the audio can be routed to a Deck (or Master). Read further details in the Alpha theta Omnis Duo manual.
- BROWSE : When in Waveform view, use this encoder to Zoom In/Out the Scratch Waveform on the Display.
When in Browse view :
Uuse this encoder to scroll through Tracks or Folders.
Push the encoder to set focus to the next VirtualDJ Browser list (Folders->Songs->Sideview)
Hold SHIFT down and push the encoder to set focus to the Folders list. If focus is on Folders list, push to open/close subfolders.
Hold SHIFT down and then use the encoder to cycle through the available tabs of Sideview. - LOAD 1/2 : Use these buttons to load the selected Track to Decks 1 and 2. Double-fast tap to clone the Track from the other Deck at the current position.
Hold SHIFT down and use these buttons to unload Decks 1 and 2. - BOOTH VOLUME : Adjusts the level of the Booth Output (Connection at the rear panel). Hardware Control - movement not visible on VirtualDJ GUI
- MASTER VOLUME : Adjusts the level of the Master Output (Connection at the rear panel). Hardware Control - Movement visible on VirtualDJ GUI
DISPLAY
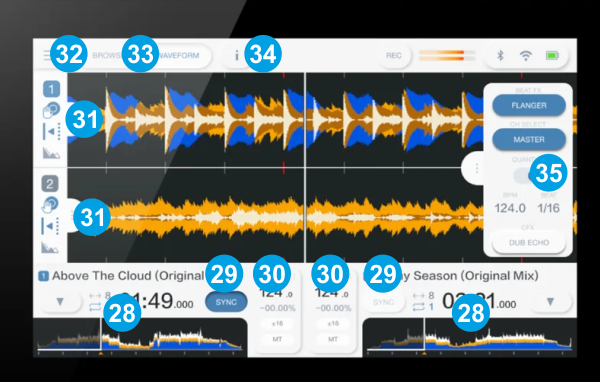
MIXER CONTROLS
- DECK INFO: Displays Deck information such as Title (Remix), Elapsed Time, BPM, Pitch/Tempo value, Tempo range and the progress waveform.
- SYNC: Tap this button to synchronize BPM and phase with the opposite Deck.
- BPM/TEMPO: Tap this area to get an additional panel on screen and select Pitch range % and enable/disable Master Tempo.
- VINYL, SLIP, QUANT: Tap this area to get an additional panel on screen and enable/disable Vinyl mode, Slip mode and Quantize
- MAIN MENU: Tap this button to get the main menu on screen where you can change the Source, visit Utilities, Waveform, Browser etc views.
- BROWSE: Tap this button to get the Browse view.
To return to the Waveform view without loading a Track, you need to tap on the MAIN VIEW (32) and then select the Waveform button. - INFO: Tap this button to get an additional panel on the right side of the screen with additional Track information of the Tracks loaded to Decks.
- FX PANEL: Tap this area to get an additional panel on the right side of the screen with Effect information and Controls. You can :
- Tap on the Effect name and select a different Effect.
- Tap to CH SELECT and select to which Channel the Effect will apply to (Decks, Master, Mic)
- Tap to the CFX button and select a different Color FX.
This panel will also display the BPM value of the selected Source along with the Beats parameter value the selected Effect will use.
FRONT & REAR PANELS

- USB POWER : Use the provided USB power adapter/charger and connect the device to an AC outlet. When not connected, the device will be powered from the built-in battery.
- SD SLOT : Connect a SD storage card. When inserted, the content will be available when selected as a Source from the Display Main menu.
- USB SOURCE : Connect a compatible USB storage device. When connected, the content will be available when selected as a Source from the Display Main menu.
- COMPUTER USB. This USB connection sends and receives audio and control information from a connected computer.
- MASTER OUT BALANCED Balanced Master Output. Connect your powered speakers or power amp here using XLR type cables. The level of this output is controlled by the MASTER LEVEL knob at the top panel
- BOOTH MASTER OUT 2 Un-Balanced Booth/Master Output. Connect your powered speakers or power amp here using RCA type cables. The level of this output is controlled by the BOOTH LEVEL knob at the top panel
- MIC2 INPUT. Connect a microphone to this socket using XLR or TRS plugs (combo input). The output level of this Inputs is controlled from the top panel
- MIC1 INPUT. Connect a microphone to this socket using TRS plug. The output level of this Inputs is controlled from the top panel

Omnis Duo - Front panel - HEADPHONES SOCKET. Connect your 1/4" or 1/8" headphones to this output for cueing and mix monitoring. The level of this output is controlled from the top panel
ADVANCED SETUP
CONTROLLER SPECIFIC SETTINGS
There are a few settings available when the Omnis Duo is connected, to unlock Needle Search on the display, turn off auto-switch to Deck view after loading a Track etc.
Open VirtualDJ Settings, select the OPTIONS tab and then the CONTROLLER sub-category.
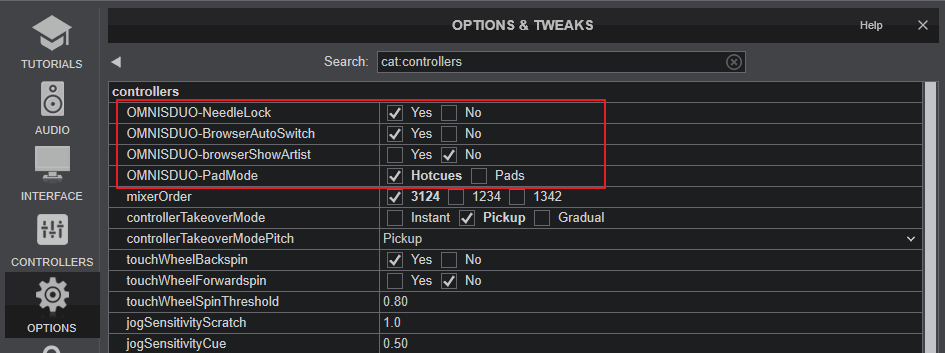
- NeedleLock : This option is useful to prevent accidental track jumps when the Needle (Song Progress Wave on Display) is accidentally touched.
When set to Yes (default selection), the Needle is locked and touching the Song Progress will have no effect.
When set to No, the Needle is unlocked and you can touch the Song Progress wave and jump to a position on the loaded track. - BrowserAutoSwitch : When set to Yes (default selection), the Browser view Switch is set to Automatic. In this mode, when a Track is selected and loaded to a Deck, the Decks/Waves view will automatically offered without pressing any other buttons.
When [set to No, the Browser view Switch is set to Manual and the Browser View will remain active after loading a track and the BROWSER button above the Display needs to be manually pressed to return to the Decks/Waves view. - BrowserAutoSwitch : When set to Yes, the list of Tracks shown in the Browser view on the device display, will display Tracks in form of Artist - Title (Remix).
When set to No (default), the list of Tracks shown in the Browser view on the device display, will display Tracks in form of Title (Remix). - PadMode : When set to Hotcues (default), the 8 Pads on the Omnis Duo will always control the Hotcues 1 to 8.
When set to Pads, the 8 Pads on the Omnis Duo will perform the functionality of the selected Pads page of VirtualDJ.
Recording & Broadcasting
The device offers the ability to record the Master Output along with the Microphone Inputs and USB/SD playback sources, directly from VirtualDJ record button (in the MASTER center panel). The dedicated Recording input channel is already pre-configured, so no further adjustments need to be done.
MICROPHONE INPUTS
The Omnis Dup offers 2 Microphone Inputs and Level controls from the top panel. The audio signals from both these inputs are directly routed to the Master Output of the device.
The Microphone inputs are not part of the USB Audio interface, so these cannot be added in VirtualDJ Audio setup and will not control the software Microphone section in the MASTER panel of VirtualDJ GUI and vice versa.
However, as mentioned in the Recording section, both Microphone Inputs can be recorded via the REC button of VirtualDJ via the dedicated recording input channel of the Audio interface.
Hardware Effects can be applied to both Microphone inputs when the MIC source is selected from the FX panel on the Omnis Duo screen.
OUTPUT FROM COMPUTER SPEAKERS
The Omnis Duo is a hardware mixer (applies its own Equalizer, Color FX, Effects, volumes etc), so your speakers need to be connected to the rear Master output sockets.
If external speakers are not available, you could use your laptop's internal speakers by adding an additional output auxout, along with an additional input auxin, as shown in the following image.